The easy way to begin mining is to go to the Windows Downloads section and download the Full Package which contains the GUI Wallet and CPUminer-Multi which contains the pool mining program. Extract the files to seperate folders.
Go into the GUI Wallet folder and run qt-boolb.exe. The first time the GUI Wallet is run, it will need to synchronize with the blockchain. Once it is synchronized, click on the Wallet tab and then click on the "Generate New Wallet" button. Find a folder that you want to store the wallet in and give the wallet name. Click "Save" and your wallet will be created.
Now, go into the CPUminer-Multi folder. The program (minerd.exe) normally runs from a command line. We can create a batch file to make it easier for us to use.
minerd -a wildkeccak -o stratum+tcp://: -u -p x -k pause Now you are mining on the pool. Blocks found by the pool need to mature first, so you do not get paid immediately. Once the block is mature, you will be sent a payment.
Dependencies:
To generate MSVC solution files, change to a directory where this file is located, and run this commands:mkdir build
cd build
cmake -G "Visual Studio 11 Win64"
After this, open build/Project.sln file in Visual Studio and build daemon and simplewallet projects. The resulting executables can be found in "build\src\Release"
Build Options
Testnet Build:mkdir build
cd build
cmake -DTESTNET=TRUE -G "Visual Studio 11 Win64" ..
cd ..
Boolberry keep log files at the same place where it keep data files.C:\Users\UserName\AppData\Roaming\Boolb
Boolberry keep log files on folders that suposed to be used for local applications data files.C:\Users\UserName\AppData\Roaming\Boolb
Normally you can see this files there:
Dependencies:
Assuming you’re using MacPorts (Homebrew is similar):
To build, change to a directory where this file is located, and run "make".
Build Options
Debug build: run "make build-debug".
Test suite: run "make test-release" to run tests in addition to building. Running "make test-debug" will do the same to the debug version.
Building with Clang: it may be possible to use Clang instead of GCC, but this may not work everywhere. To build, run "export CC=clang CXX=clang++" before running "make".
Static Build:rm -rf build; mkdir -p build/release; cd build/release
cmake -D STATIC=ON -D ARCH="x86-64" -D CMAKE_BUILD_TYPE=Release ../..
make -j daemon;cd ../..;
Testnet Build:rm -rf build; mkdir -p build/release; cd build/release
cmake -D STATIC=ON -D ARCH="x86-64" -D CMAKE_BUILD_TYPE=Release ../..
make -j daemon;cd ../..;
Boolberry keep log files at the same place where it keep data files./Users/UserName/Library/Application Support/Boolb
If you cannot access Library folder, follow these steps:
Boolberry keep log files on folders that suposed to be used for local applications data files./Users/UserName/Library/Application Support/Boolb
If you cannot access Library folder, follow these steps:
Normally you can see this files there:
Dependencies:
Here is an example of a build for Ubuntu 13 or 14. The first steps are to add the PPA that contains Boost 1.55. The rest is self explanitory:sudo add-apt-repository ppa:boost-latest/ppa
sudo apt-get update
sudo apt-get -y install gcc-4.8 g++-4.8 libboost1.55-all-dev git cmake
git clone https://github.com/cryptozoidberg/boolberry.git
cd boolberry; make -j
The resulting executables can be found in "build/release/src"
More Build Options
Debug build: run "make build-debug".
Test suite: run "make test-release" to run tests in addition to building. Running "make test-debug" will do the same to the debug version.
Building with Clang: it may be possible to use Clang instead of GCC, but this may not work everywhere. To build, run "export CC=clang CXX=clang++" before running "make".
Static Build:rm -rf build; mkdir -p build/release; cd build/release
cmake -D STATIC=ON -D ARCH="x86-64" -D CMAKE_BUILD_TYPE=Release ../..
make -j daemon;cd ../..;
Testnet Build:rm -rf build; mkdir -p build/release; cd build/release
cmake -D STATIC=ON -D ARCH="x86-64" -D CMAKE_BUILD_TYPE=Release ../..
make -j daemon;cd ../..;
Linux Build Troubleshooting
If you have trouble compiling, try using make without "-j" switch.
Boolberry keep log files at the same place where it keep data files.~/.boolb/
Boolberry keep log files on folders that suposed to be used for local applications data files.~/.boolb/
Normally you can see this files there:
The daemon is the heart of Boolberry. It is used by the command line wallet, the pools and it is even hidding inside the GUI Wallet. The daemon is the software that connects to the Boolberry network.
Most users will use the daemon to allow the command line wallet to connect.to the network. Solo mining is done with the daemon.
To start solo mining from the command line:booldb --start-mining=
If you already have the daemon started, enter this command:start_mining
Even though Boolberry has a fully functioning GUI Wallet (graphical use interface), you can still use the command line interface version.
First, some background on the wallet files. A wallet consists of three files: a keys file, a data file and a text file. The keys file is THE most important file. It is encrypted with your password and if you lose this file you lose your coins. The keys file is portable and can be used on any OS. Next is the data file. It will has a .bin extension. It keeps synchronisation data and can be reproduced if lost or corrupted. Note, the data file is not portabe which means you cannot move it between Windows/Linux/Mac platforms. The third file has the extension address.txt. It is simply a text file of your wallet address. It makes it easy to see your address without running the wallet.
To generate a new wallet, use this command:simplewallet --generate-new-wallet="path\to\file\want_to_be_reach.bin"
You will then be prompted for a password. There is an option to enter the password on the command line, but then the password will be saved in your command history which can be read by others.
Here is an example showing password use on the command line:
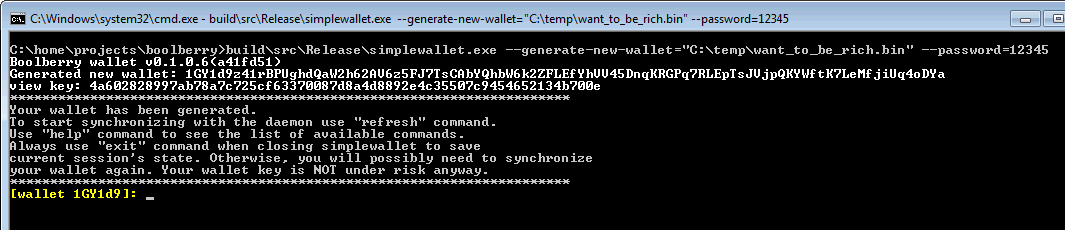
You'll see that your address is: 1GY1d9z41rBPUghdQaW2h62AV6z5FJ7TsCAbYQhbW6k2ZFLEfYhVV45DnqKRGPq7RLEpTsJVjpQKYWftK7LeMfjiUq4oDYa To close wallet use "exit" command, or just "q".
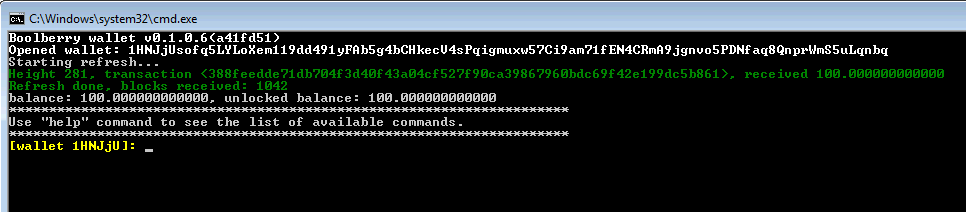
To open existing wallet use this command:simplewallet.exe --wallet-file="C:\temp\want_to_be_rich.bin"
When an existing wallet is opened, it will immediately start synchronizing with daemon (make sure it is already running), and if you've received some money you'll see it with green colored text:
To transfer money pass this command to wallet's console:transfer 1 1GY1d9z41rBPUghdQaW2h62AV6z5FJ7TsCAbYQhbW6k2ZFLEfYhVV45DnqKRGPq7RLEpTsJVjpQKYWftK7LeMfjiUq4oDYa 10
Or, if recipient have alias, you can use this command:transfer 1 @zoidberg 10
If succeess, you'lyarnl se:

You can map your long address string with short nickname, and it can be used in transfer commands. Mapping is possible when you find a block and each block can map only one alias. The valid alias characters are lower case English letters, numbers, hyphen and periodin order to protect aliases from "phishing" and cheats. .#define VALID_ALIAS_CHARS "0123456789abcdefghijklmnopqrstuvwxyz-."
If you do mining and want to set up your miner to add alias to blockchain, pass this command into daemon console:make_alias luckycat 1GY1d9z41rBPUghdQaW2h62AV6z5FJ7TsCAbYQhbW6k2ZFLEfYhVV45DnqKRGPq7RLEpTsJVjpQKYWftK7LeMfjiUq4oDYa
The alias will not be committed into blockchain if the alias is already in use.
If you want to track more technical info in daemon, feel free to set different logging level from 0 to 4 with this daemon command:set_log 1
But be careful with log file size.
Each block have a vote for bounties for developers team. Once a day, each 720's block transfer reward to team according the number of voted blocks. For example:
If all of last 720 block's voted for donation than transfered maximum amount - 1% of day reward.
If half of last 720 block's voted for donation than transfered half amount - 0.5% of day reward.
If none of last 720 block's voted for donation than nothing transfered.
By default it turned to ON, assuming that you support projects team. But if you disagree with that, feel free to set donation vote to off (false), and your vote will decrease project's team reward. To set donations mode in running deamon:set_donations [false|true]
To set up this at daemon command line option:boolb --donation-vote=[false|true]
To turn on displaying hash rate, type command in daemon console:show_hr
By default GUI build is disabled since it have additional requirements:
Unix and MacOS X
Building on Linux is not related with any significant problems, usually works in this way(supposed that common build steps is done, cmake, compiler and boost installed):
sudo apt-get install libgl1-mesa-dev libdrm-devmkdir -p build/release; cd build/release
cmake -D BUILD_GUI=TRUE -D CMAKE_PREFIX_PATH=/home/user/Qt/5.3/gcc_64 -D CMAKE_BUILD_TYPE=Release ../..
make qt-boolbWindows
Building for windows related with some adjustments. At first you have to decide what kind o build you want: static or dynamic qt link. Official Qt downloads http://qt-project.org/downloads offers prebuilt binaries for few combinations of compilers/platforms and all of them use dynamic link. This means that run qt-boolb will needs bundle of qt dlls. In that case, after installing Qt, you need to:
cd boolberry
mkdir build
cd build
cmake -D CMAKE_PREFIX_PATH="C:\Qt\Qt5.3.0\5.3\msvc2013_64" -D BUILD_GUI=TRUE  -D STATIC=FALSE -G "Visual Studio 12 Win64" ..
cd ..Making a static build is also good idea, since it let easily distribute binary. To be able make static build, you have to build QT in static mode. Static build howto coming soon
Wallet consist of two files: wallet data file, that usually called "my_wallet.bbr" and wallet keys file, that called "my_wallet.bbr.keys" . Last one is very important, better to keep backup of this file, and if you lost this file - you'll spend you coins. Wallet keys file creates only once and then newer updated, it's used only for reading, unlike wallet data file, which is used for keeping transactions history and organizing internal database, and updated after ever wallet use. Sometimes, by different reasons, wallet file may be corrupted, this is not critical since you could always re-build your transactions history by re-synchronizing wallet with blockchain.
To re-build wallet data file:
When re-synchronizing finished you'll see recent transfers history (but you won't see receipens since it was lost with original data file) and now you able to use your wallet.